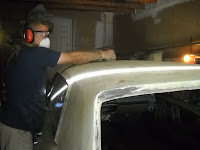
In the last few days I've had a lot of progress and broken some "fear barriers" that kept me from moving on with the project. I re-sanded the bare metal of the roof and carefully inspected the small pits or grooves on the metal. Then after thoroughly cleaning the bare shiny metal with a metal prep spray, I began applying body filler in thin layers. The process took about half of a "gallon" (it's much less than a gallon, about 1/3rd, when you open the new can!) of filler (Rave Gold).
Lesson learned: let it dry 1/2 hour and remove excess with the shaping file. Don't go and shape-file the next day. It was a lot harder and difficult to shape. But it turned out well, I think. It needs a re-coat here and there, and I got some body filler grooves that I need to refill and correct. Once I get the entire roof shaped smooth, I'll move on to the side panels...
Yesterday I took a break from bodywork and removed a ball joint (driver side) with the dust boot broken. I inspected it and decided it was best to replace not just that one but both sides. I'll also begin replacing all steering system bushings: Front strut rod bushings, end link bushings, anti-sway bar bushings, front strut bar bushings, etc.
I removed the cowl to apply panel joint sealer to the seam between the hats and the cowl sheet metal, since these seams are not completely tight, the hats are only spot welded. I noticed a growth of flash rust on the firewall metal, after I had brushed away all of it. Now I am starting to really consider glueing the cowl, instead of welding it. Rust will develop no matter what, but if I glue the cowl with 3M 8115 panel bond and reinforce it with bolts, maybe that will help slow down the relentless rusting process that I foresee if I weld my brand new cowl to the firewall. Replacing the firewall is out of the question; no money, no skill, no time...
-----------------------------------
Update:
Replaced both upper and lower ball joints on each side. Next comes all bushings...
 |
| comparison between old and new. Notice the placement of the grease nipple |


Great progress! I'm a little concerned about gluing the cowl in instead of welding it. Not that it won't work but I haven't seen it done (yet). I'm really anxious to see how it turns out. You'll be bonding metal to metal with no primer in between right?
ReplyDeleteright. Brand new, e-coated metal (new cowl), to all banged up, rusty and irregular original metal.
ReplyDeleteThis Tech did a combination of Panel bonding and welding:
http://www.youtube.com/watch?v=sYb2ywOkhXI&feature=relmfu
He used panel bonding on the sides because he did not have access for welding. Everywhere else, it was welded.
These gentlemen used only 3M 8115, but they clearly state it is not meant for structural components, such as the 1967 cowl (they are working on):
http://www.youtube.com/watch?v=sSbEcXrPWtw
so, if I glue it, I'll have to reinforce it with something. Welds may not work because of the condition of the firewall (which I have a Plan B for its repair), and I am very concerned about the unexposed metal within the welded surfaces. But I'll most likely try to weld it first (I really suck as welding is concerned, or it's probably my welder).
Hey, I appreciate your comments. Finally someone is giving me some opinions! Please keep'em coming.
Ivan
I'm with Ian on the cowl, that is, to weld it in place instead of using the adhesive. One suggestion on your welder...see if you can get a gas kit for it to convert it to a true MIG welder. Granted, you'll be spending money for the kit (~$100) and have to buy a tank of shielding gas ($80), but you can drop down to .023 MIG wire that will work much better on the sheetmetal. I bit the bullet and did it before starting the serious metalwork on my fastback. It made a world of difference. If you don't want to go the MIG route, see if you can find .030 fluxcore wire. It will be a little cooler to weld. You are really kicking your work into high gear. I love it your daughter and neighbor kid are helping. That's awesome!
ReplyDelete