Sunday, November 10, 2013

Rocker Panel Molding Install


I searched all over the net for a systematic procedure to install a '67-'68 Mustang rocker panel molding but as usually happens, I did not find one that answered all my questions and specific issues. But in the end my efforts were good and after minor complications, I was able to install my car's original factory accessory rocker panels. Modern reproduction panels are about $35.00 each, but the quality is very questionable, so I considered myself very lucky to have the originals in such great condition that all they needed was a 0000-steel wool rub to bring out the shine. The Dynacorn-brand molding clip set is about $15.00 is of excellent quality, and brings all necessary clips for both sides and rivets.They fit perfectly (for a change!)
I had to use extra rivets from my kit since I snapped a few of these broken during the install.


Some folks initially think that the small tab on top of the clip is where the molding snaps into. This tab is to keep the molding from rubbing against the paint, and eventually scratching it. The molding snaps on each of the four lips of each corner of the clip. The problem is that sometimes you have to massage the molding to make it snap tight against the clips.
  

The front bracket holes in the right fender were covered with body filler, a minor complication. So I  accessed the holes from the inside of the fender. Once I located the original holes I took a smaller diameter drill bit and with my hand's index and thumb, began "drilling" through the filler from the inside out. Once the panel was drilled through, I completed the hole with the right diameter.

Use the metal bracket and screw (included) to attach this clip to the fender


Then I followed through with the remaining smaller holes (5 in total) for the brackets on the fender.

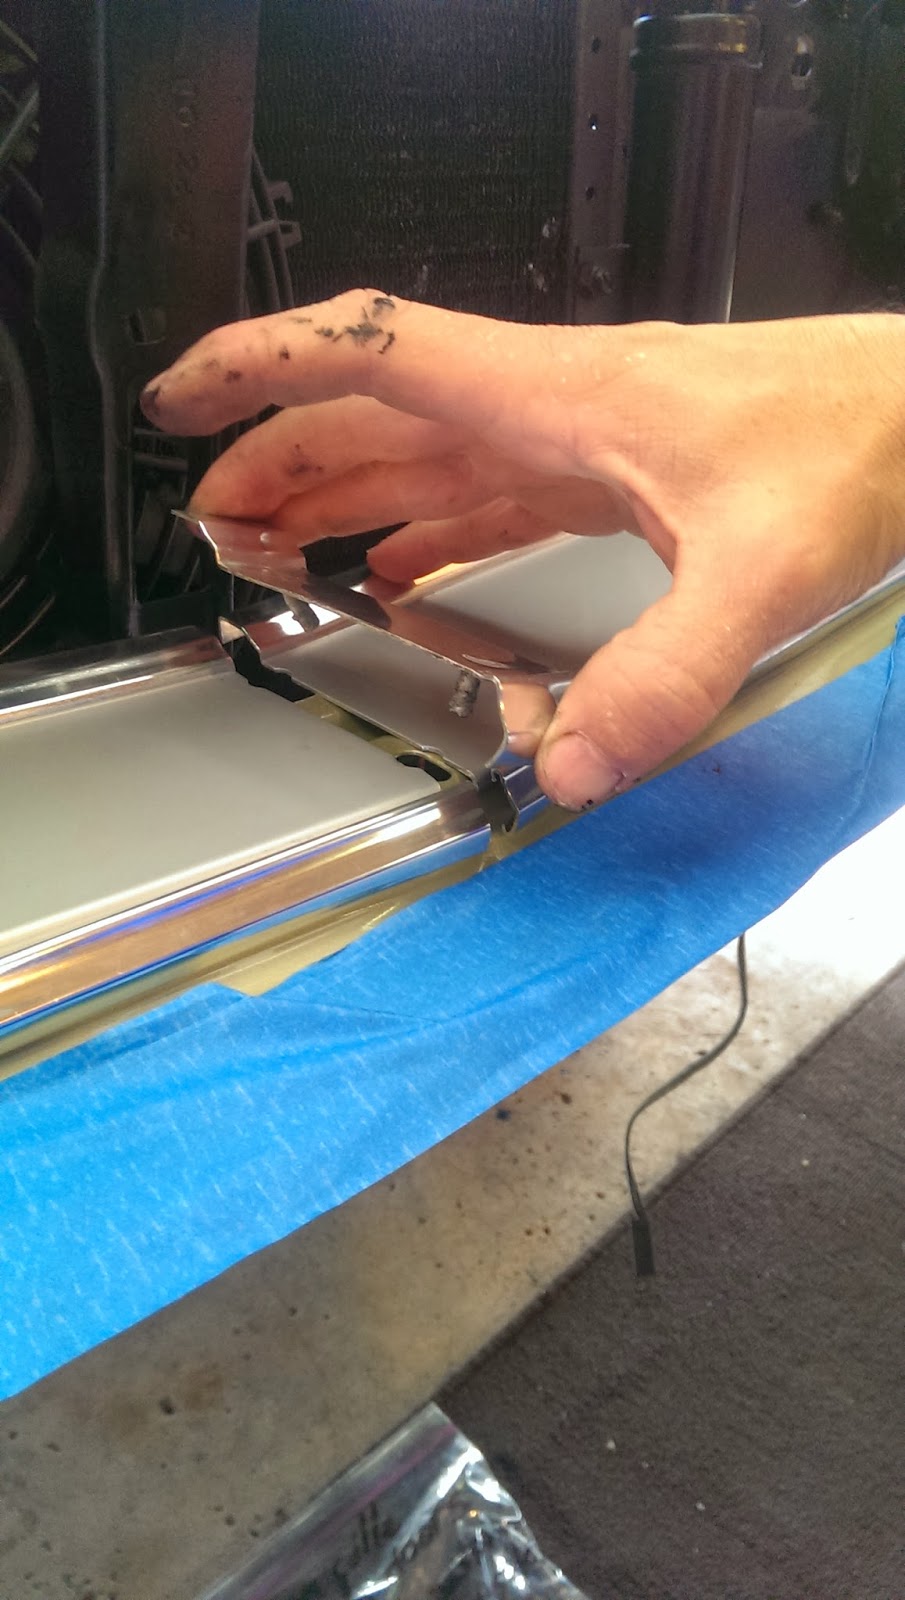
Place the molding against the bottom side of the clips as shown, and then snap together the top side. Once all clips were fastened, the molding was test-fitted. Most of the clips snapped ok, except for a couple, so I had to remove the molding back out and carefully and evenly pull the sides close a bit at a time to make everything snap together tight.

grab it like this and compress...

And try again until all clips snap tight

It took me about 1 hour of planning and rehearsing the steps, and about 2 hours to do both sides. The final product should look flush without any bends (where you compressed), and should feel tight.

Sunday, November 3, 2013

Installing Rear Applique Panels

Even though I prefer the 67-68's look with chrome bezels around the tail lights, the rear appliques are a rather rare option for 67 Mustangs. So I felt it'd be a good thing to leave them as one of my car's unique features. These are also hard to find in original, pot metal. As reproductions (in cast aluminum), they can be quite expensive at about $280.0-$300.0.
I always liked these panels painted in gloss silver or charcoal gray, so this was my chance to finally get these painted the way I like them. STN Auto Restorations had them media blasted to remove at least 2 older coats of paint. When the car was painted in the mid 1990's the previous painter did not remove the appliques and just painted them in place. This was all corrected when STN painted the car this year. After blasting, the panels were painted gloss metallic silver. I think they look really nice.

                                                      The original look before repainting:
 
New tail light lenses were also installed:

After positioning the panel, I attached the lower threaded studs to the panel's lower posts
Then I screwed in the three top studs and fastened the nuts


The shiny glossy silver appliques, along with the chrome trim and the pop-open gas cap give my coupe a distinguished look. Once I get that trunk lid straightened out and the emblems installed, it's going to look awesome.


Tuesday, October 15, 2013

Assembling the Doors

I knew the doors would give me a hard time, especially when these were disassembled at the paint shop and all parts placed in a box for me to worry about! So I kept postponing this work until I felt it was the right time.
The vent window assembly was out and remained out until after the regulator and window assemblies were installed. You'll need the extra room to maneuver for these. Also, I made sure the fresh paint along the belt line (where the felt strips go) is protected with "spongy" tape or something similar. 

The door glass, the frame, and glass run hinge were all assembled together as one assembly, but they were full of grime, caked grease and some rust, and so was the regulator, contributing to the sluggish feel of the crank mechanism. So I thoroughly cleaned and re-greased them:

Before installing any of the components below, we installed the brand-new door handles. This allows the most access and space for work.
Alanis' little hands and forearms came in handy. While I was cleaning and greasing the regulator components, she had those door handles and door locks installed in no time! 

After that, we began the rest of the installation:
1.   Inserted and attached the vertical track (door window guide) but did not tighten, and prepared to detach it in step 6. I did this to have a good idea of where the window frame rollers needed to be positioned.
2.  Slid the regulator assembly through the door side, gear first. Find the crank hole and guided the four (4) regulator attachment nuts to their respective holes in the door's inner skin. Loosely attach all 4 nuts.

1967-68 Regulator and vertical track assy.

3. Cranked the regulator to the point where I could slide the rear roller of the regulator into the front end (vent window side) of the door glass track.
4. Slid the window into the door channel at about at an angle, enough to get the rear wheel of the regulator into the glass track. Then slid the glass forward until I could slide the front roller (the one towards front end of car) of the regulator into the track.
5. Crank the window up or down until the lower roller can be inserted into the short track guide (this is attached with 2 bolts to the inner door skin).
6. Now I detached the vertical track assembly (door window guide, Step 2) and manually positioned the vertical track so as to be able to insert the rear window roller  into the vertical channel of the vertical track assembly.  Raised the vertical track assy. and bolted down, this time permanently.
7. Rolled the window down and and then tighten all bolts.
8. Inserted the vent window assembly:
1.2. 3.
 
  • Lowered the window assy. down while aligning/inserting the window glass into the vertical channel (the door run channel with the felt strip) of the vent window frame. 
  • Stop lowering until the rear channel (of the vent frame) threaded slot is in line with the door skin access hole. From that access hole, screw in the specialty bolt/washer (washer on the felt channel slot side, not against the door skin).
  • I had to align the attachment of the upper stop slot (in the window frame), with an access hole in the inner door skin, to attach the upper stop bracket (in my case, it was not installed):
  • Lowered the vent window frame all the way down and aligned all four bolt attachments. Then I attached all bolts loosely and adjusted for alignment.

9. Installed the door beltline weatherstrip (felt strips) at both sides of the door's window channel.
10. Installed the window glass lower bumper at the slot in the bottom-center of the door. You must do this step AFTER you install the felt weatherstrip (step 9), because you have to roll the window below the belt line, to have the room to install the weatherstrip:


11. Installed the rubber door bumpers and the screw-in window brackets (black rubber) on the door jamb areas.
Both driver and passenger sides are pretty much the same process, but for a few small variations I noticed rather quickly.
The windows have to be aligned for proper window movement, not only with the vent window frame, but also with the vertical track, and quarter window. I achieved this by adjusting three different bolts, two from the window assy. (4) and one from the vent window frame (5, 6):

4.         5.    6.

When finished, we had a tight and fully functional assembly, with new rubber weatherstrip, and all rollers and tracks cleaned and re-greased. Everything felt brand new!
A few caveats: Granted, some steps are interchangeable, and every situation is different, but the general procedure is as described. I need to cover the door latch-to-handle rod with something similar to the canvas fabric that originally covered it. As it is right now, it is touching the door skin metal, which might cause noise later. I decided not to apply any sound-deadening materials on the inner side of the outer skin. Maybe I'll regret this later, but right now, I just want to get the car finished. The door panel, wiring ($37.00 new e/a), speakers (4"x8") and door light, will be installed next. 

Friday, September 27, 2013

The Front End

(Front-End Assembly of a 1967 Ford Mustang)

What I thought would take half a day turned out a two day ordeal for me. The splash guards inside the fenders were not installed as the car came from the paint shop, causing me to have to remove the fenders again. It raised the stress levels, knowing that anything could damage the new paint. But it all turned out OK. It's always good to have the internet for tips from Mustang enthusiasts. The Average Joe Restoration site showed me how to assemble the headlight bowl/buckets. Several times I had to do, undo and redo. But I learned a lot and I'm happy to say that I did it all myself....well, my daughter helped a lot too. She even pointed out that I was bolting the valance the wrong way (with the tabs outside). Sometimes you need to stop, step away, take a break, get some perspective, swallow your pride...

First I reviewed the steps one by one and made sure I knew where everything was attached to, and that I had all hardware needed. All original parts to be reused, I thoroughly cleaned, stripped (where necessary) and repainted. All screws and bolts were new. There was to be no grimy rusty hardware in my new front end.
These tasks delayed my project a whole day. I had to refinish them before reinstallation and it was a  tough job, but they turned out nice. I could have bought all these of course, but I decided I could refinish them, add rust protection, original colors, new hardware, and save some money:
Yes, I went through the trouble of removing the rubber flaps, refinishing the metal and reattaching the flaps with new clips.

I assembled the valance (parking lights, bezels and self-retaining nuts):


Then I assembled the headlight buckets. A rather simple job, once I knew how to do it:

After carefully disassembling the fenders to keep the fresh paint from scratching, installing the headlight bucket assy., I re-installed the fenders. Then I installed the brand new repop stone guard using 3 special square-headed bolts:


The four (two inner and two outer) bumper brackets were installed. These were left loose until the bumper was fitted.


Then I installed the wide grille moldings. These are the original pieces that I recoated with argent gray for a fresh look. It took 3 screws in the front (per half), and three in rear tabs (engine side):

Next step was the thin grille moldings. These use 3 of the special "fishhook" type molding clips which come with their own nuts:

Fit was rather good. I did not experience many poor-fitment issues. Everything seemed to sort of fall into place...mostly.

After the thin grille molding, the grille joint cover was installed (A), then the grille (B, C)
A    B.  C.

 After that, I reconnected all wire plugs for the headlights and tested them:


After installing the horse/corral and grille bars ("blades"), everything was ready for the installation of the valance, but before that, I decided to test-fit the bumper to see if the gaps between stone guard, the grille moldings and bumper were good.
The bumper requires 4 chrome round-head bolted to the inner and outer bumper brackets. Then two fender bolts at each brackets in each end of the bumper, these are bolted to the fender (from the inside) to a self-retaining nut in the bumper bracket:

Once all that was done, I installed the valance and checked fit. Then I did the following steps to check fitment again and again until everything was right (every case is different):

Removed the bumper back out
Bolted the two upper bolts of the valance onto the car frame,
Reinstalled the bumper (loose),
Connected the parking light plugs,
Tested operation of the parking lights,
Completed the assembly of the valance (lower and side bolts),
Tightened all bumper bolts
Tightened all valance bolts


OK, maybe there was an easier way to do it, but that's is how I did it, based on the particular fit of all my parts. Both the Stone guard and the valance are aftermarket sheetmetal and I had to do some pushing and bending.  

The hood trim followed. This is a brand new piece to replace the old faded one:

 Finally, Alanis installed the bumper guards and, after the lights were adjusted, the door light rings: 
The bumper was about 3/4 inch higher on the passenger side. The inner bracket had to be pushed downwards a bit. Problem solved.

Not bad for a Ford Mustang rookie family. It feels good knowing that you are using brand new shiny hardware, and that all original parts reused are clean and refurbished.